Updated on November 26, 2025
This Wildlife Animal Blanket is a project especially close to my heart. I originally began designing it for my son whose love for animals seems to grow by the day. His room is a tiny jungle filled with books, plush creatures, and endless curiosity. Watching him point to each square and proudly name the animals (“lion!” “giraffe!”) has been one of the sweetest parts of this creative journey.
I wanted to make something meaningful for him. Something warm, comforting, and filled with the wild animals he adores. So I began creating my own series of filet crochet squares, each featuring a different animal. Every design is original, and I’m sharing all of them here as free patterns so you can crochet along and create your own Wildlife Animal Blanket.
The giraffe began the adventure, followed by the lion, elephant, monkey, koala, hippo, bear, tiger, panda, rhino and fox. Each square brought its own personality, charm, and story to the blanket.
And now, I’m excited to announce the newest and final animal in the collection: the leopard! With its majestic spots and powerful presence, the leopard brings a bold and striking finish to the Wildlife Animal Blanket. It’s the perfect closing chapter to this safari-inspired crochet journey.
Since all animal squares are now complete, this page also includes everything you need to assemble your blanket. You’ll find detailed instructions for joining the squares together and for adding a clean, beautiful border to finish your project with style.
Keep scrolling to explore every square and learn exactly how to bring all the pieces together into one cozy, meaningful blanket.
Disclaimer: This pattern is for your personal use only and cannot be sold, copied, or reproduced in any way without permission from the designers. You may sell finished objects made from this pattern in small quantities but please provide pattern credit back to crazycrochetstudio.com as the pattern designer when posting online. Do not use my photos when selling your finished items.
Everything you need to start the Wildlife Animal Blanket
For my Wildlife Animal Blanket, I used Zeeman Royal yarn. It’s a soft, affordable worsted-weight acrylic that’s easy to work with and widely available in the Netherlands. Each skein is 100 grams / 241 meters, making it a great option for larger projects like this one.
To complete all 12 animal squares, I used 6 skeins in total of the beige/cream color. That comes down to about half a skein per square. I used slightly less than 1 full skein for every 2 squares.
For joining and the final border, I switched to a beautiful taupe shade. I used a little more than one skein to complete the entire joining and border.
I worked the blanket using a 5.0 mm crochet hook, which gives the squares a lovely balance of structure and softness.
Of course, feel free to choose any yarn you prefer. Lighter options like DK also work wonderfully, just remember to adjust your hook size to achieve a smooth, flat fabric that suits your personal tension.
Make it your own, and enjoy the journey of stitching this wild and wonderful blanket!
You will also need:
- Scissors
- Tapestry needle for weaving in ends
If you’re planning to join multiple animal squares into a blanket, try to use the same yarn weight and hook size throughout. This will help your squares stay consistent in size and make assembling the blanket much easier.
For the joining and border, consider using a contrasting color that complements all the animal squares.
Finished Size Blanket
The completed Wildlife Animal Blanket measures approximately 100 x 128cm (39.4 x 50.4 inches). Because this project is made up of individual filet crochet animal squares, it’s wonderfully easy to adjust the size to suit your needs.
Whether you choose to make a smaller blanket with just a few of the animal squares or go big, you can easily adjust the size by adding or removing squares.
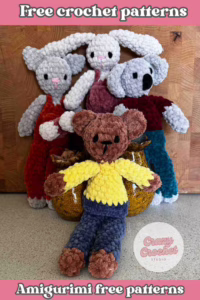
Explore All Free Animal Patterns
Here, you will find all the designs I’ve lovingly created and shared. Each one with its own dedicated post full of step-by-step instructions.
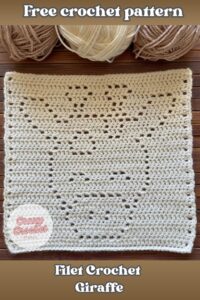
Free filet crochet pattern: Giraffe

The giraffe is the very first square in my Wildlife Animal Blanket. You’ll find the free pattern for this square right here.
Free filet crochet pattern: Lion
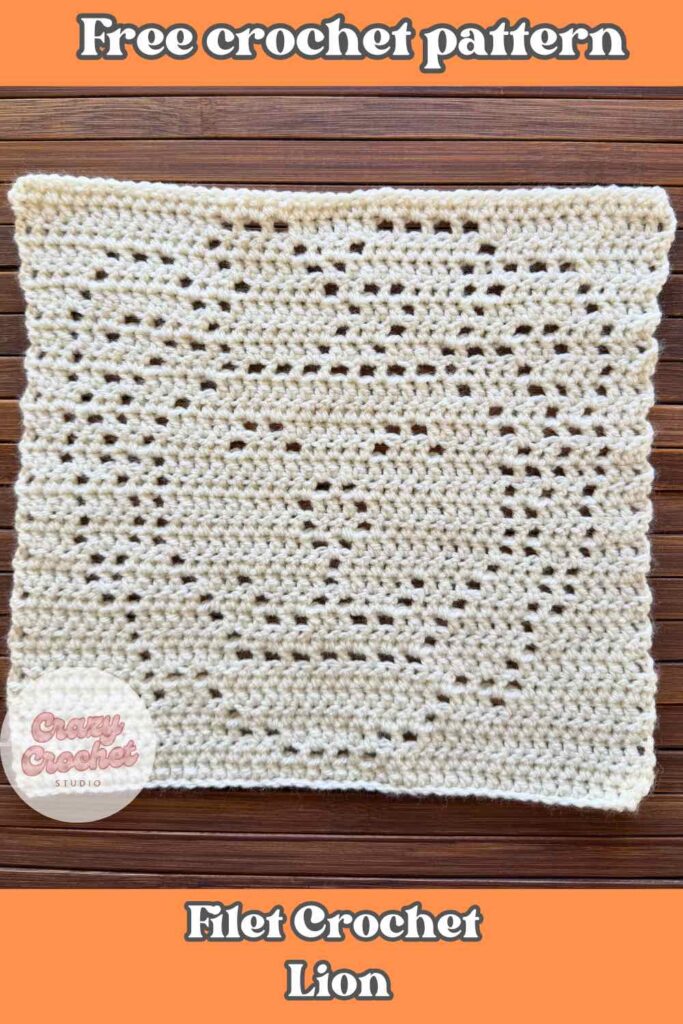
This square is the second design in my growing Wildlife Animal Blanket. This square features a bold, proud lion brought to life with simple stitches and a strong silhouette.
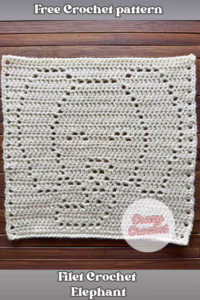
Free filet crochet pattern: Elephant
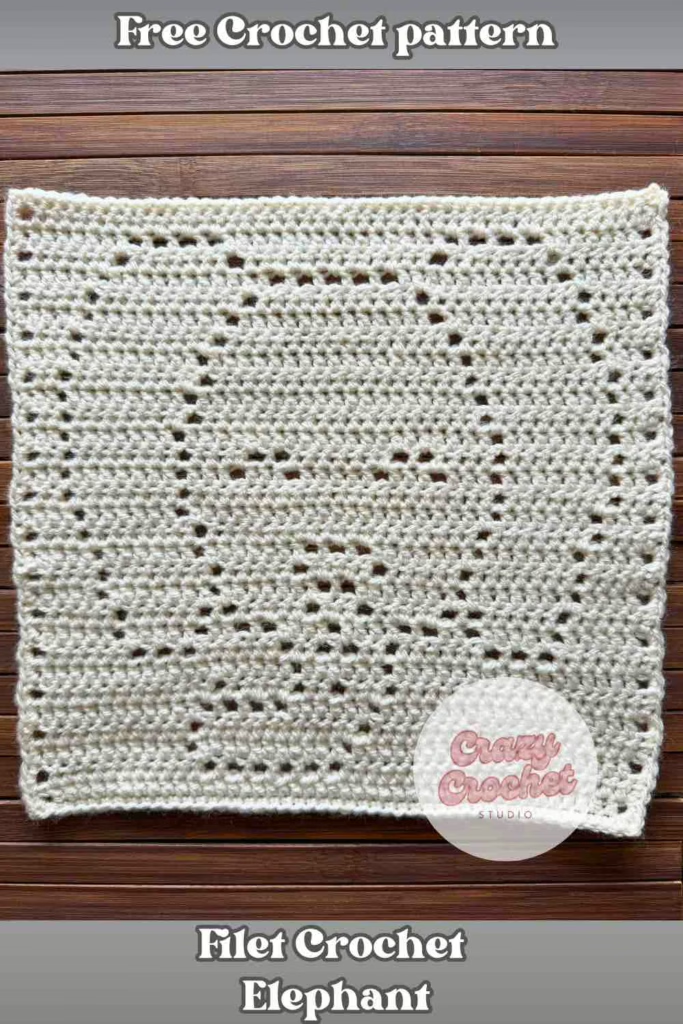
This sweet elephant square is the third design in my Wild Animal Blanket series.
Free filet crochet pattern: Monkey

The monkey is the fourth square in my Wildlife Animal Blanket series. With its playful spirit and curious little face, this square brings a fun and lively energy to the growing family of wild animal friends.
Free filet crochet pattern: Koala
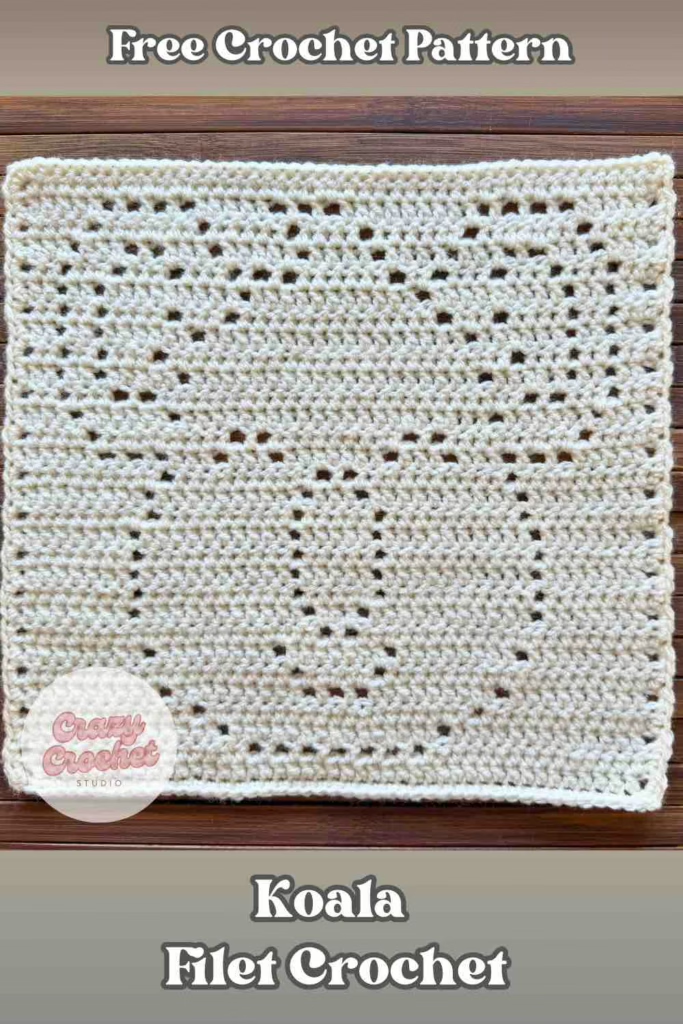
The koala is the fifth square in my Wildlife Animal Blanket series. With its soft, cuddly look and calm expression, this design adds a sweet and gentle touch to the collection. Inspired by the adorable koalas I saw during my trip to Australia.
Free filet crochet pattern: Hippo

Meet the lovable hippo, the sixth design in my Wildlife Animal Blanket series!
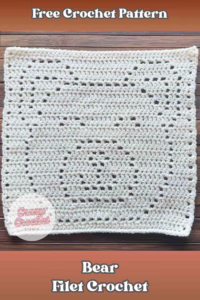
Free filet crochet pattern: Bear
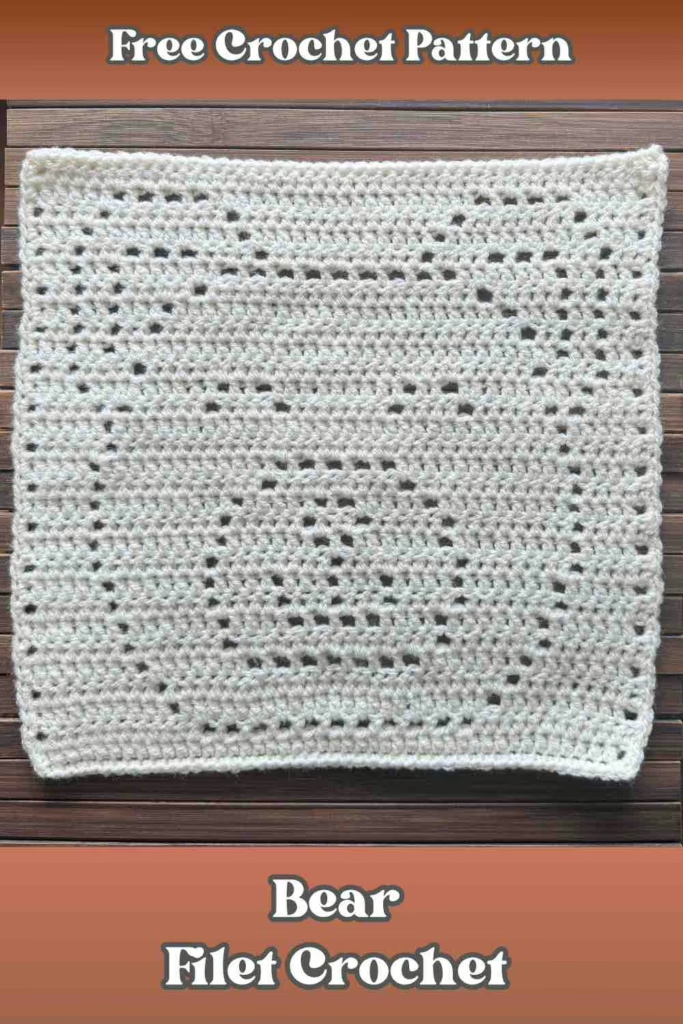
This is the bear square, the next design in my Wildlife Animal Blanket series!
Free filet crochet pattern: Tiger

Meet the Tiger! The next member of my Wildlife Animal Blanket series is here. Bold, beautiful, and ready to roar!
Free filet crochet pattern: Panda
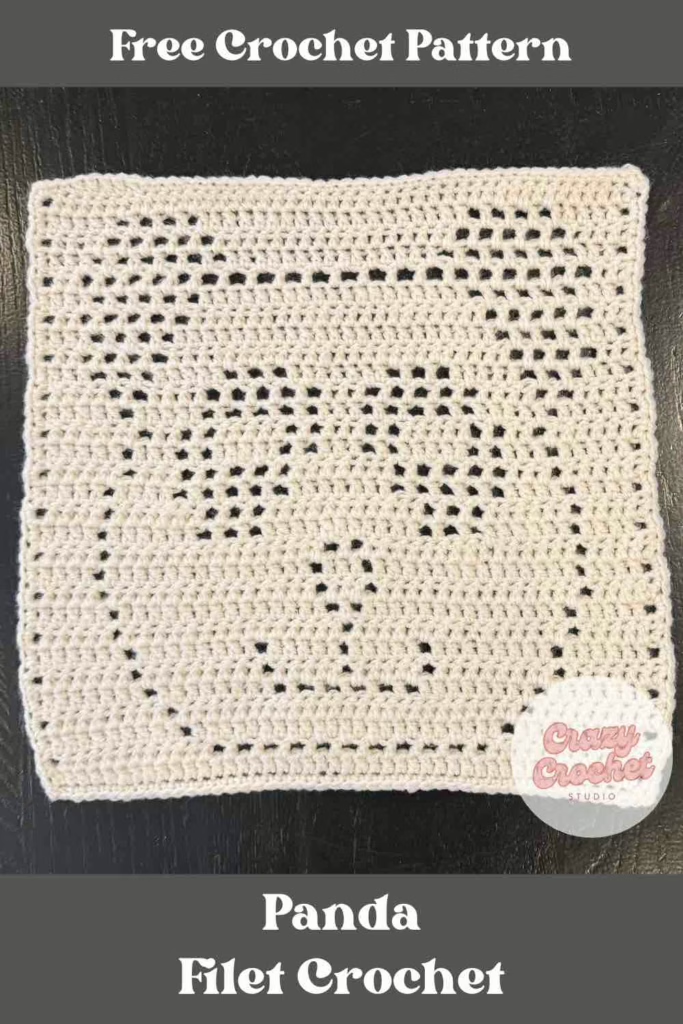
Meet the Panda!
The newest member of my Wildlife Animal Blanket series has arrived. Calm, cuddly, and full of charm!
Free filet crochet pattern: Rhino
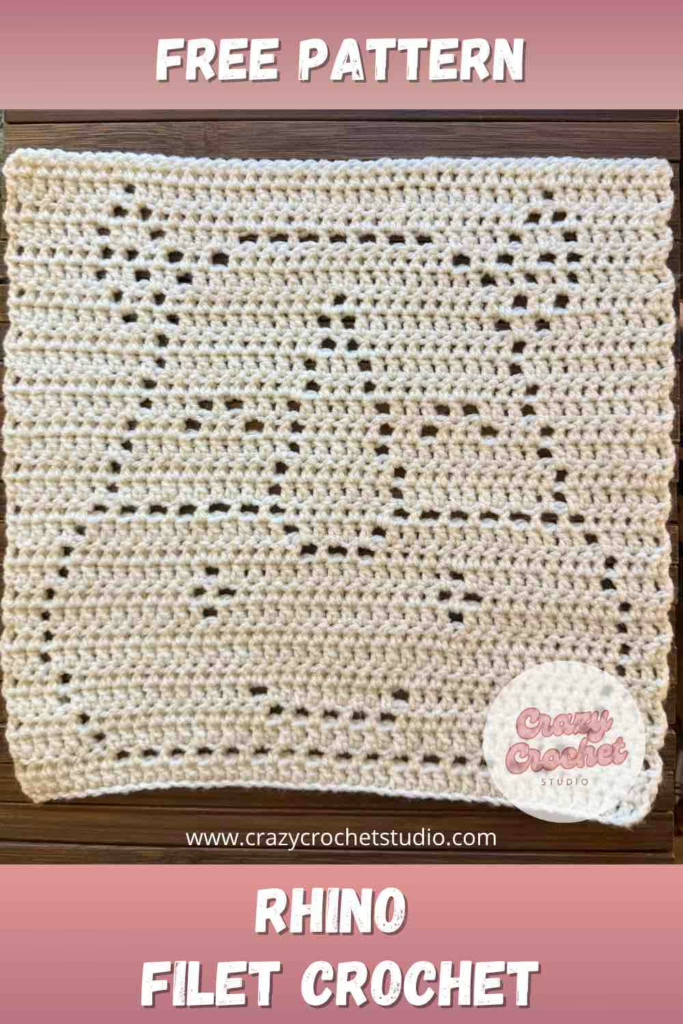
Meet the Rhino! This Wildlife Animal Blanket square features the mighty rhino: calm, strong, and full of character. A gentle giant that brings a touch of wild beauty to your crochet collection.
Free filet crochet pattern: Fox
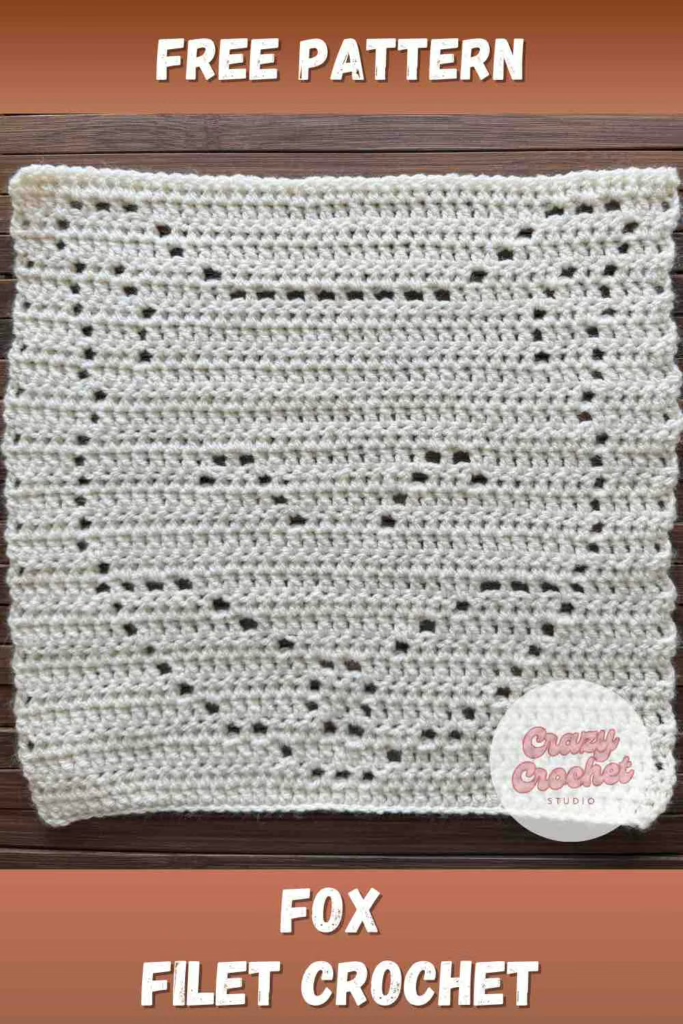
Say hello to the clever and curious fox! This is the next beautiful design in my Wildlife Animal Blanket series.
Free filet crochet pattern: Leopard

Say hello to the powerful and graceful leopard! This stunning big cat is the final design in my Wildlife Animal Blanket series, completing the full collection of wild and wonderful animals.
JOINING INSTRUCTIONS
One of the best things about the Wildlife Animal Blanket is how flexible the layout can be. You can arrange the squares in any order you like. Mix them up or group similar animals together. There’s no right or wrong way to do it. Follow the layout I used or create a completely unique arrangement that feels perfect for you. This freedom is part of what makes the blanket so personal and fun to create!
Abbreviations & Helpful Notes
Before you begin assembling your Wildlife Animal Blanket, here are the stitches and essential notes you’ll need for the joining process. These instructions are written using US crochet terms
Abbreviations:
- CH = chain
- SL ST = slip stitch
- SC = single crochet
- HDC = half double crochet
- TC = treble crochet
To keep in mind:
- Whenever you see stitches written between { }, work them all into the same stitch or space.
Flat Braid Join
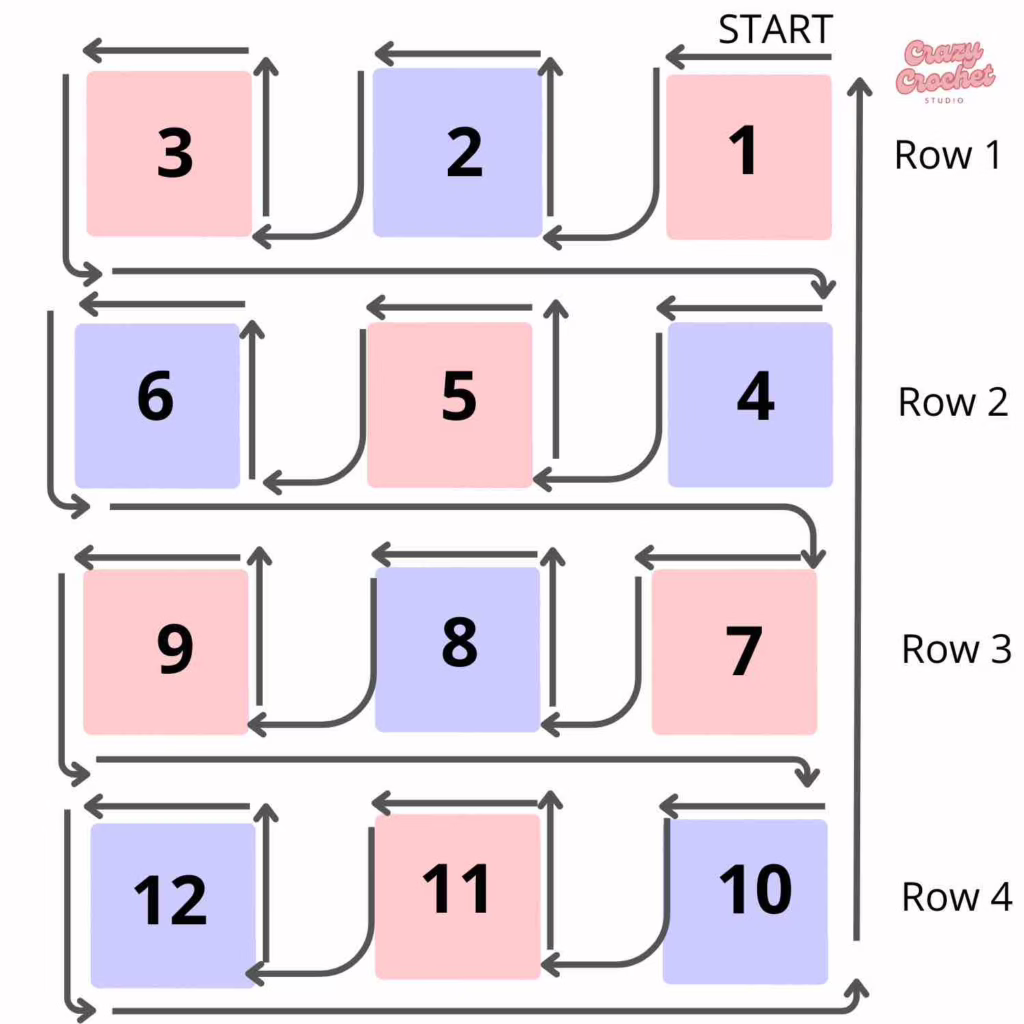
To join the Wildlife Animal Squares together, we’ll be using a classic flat braid join. It’s a beautiful, lacy method that adds texture without overwhelming the designs. Start with the square you want in the top-right corner of your blanket, then work your way from right to left, connecting each square row by row.
For this project, each animal square requires 22 loops along every joining edge. These loops form the foundation of the braid and allow the squares to link together neatly while maintaining an even, flexible structure.
Row 1
Square 1
On the first square: Attach the joining yarn in the first ST left of the top right CH2 corner space. CH4, skip the next stitch, SC into the next stitch. *CH3, skip the next stitch, SC into the next stitch*. Repeat between ** until you reach the last stitch of the first side. The last stitch should be the final stitch before the CH2 corner space. There will be 22 CH3 loops across the side of the square (this will be the same for each side of the squares).
CH5, skip the CH2 corner space, SC in the first stitch after the CH2 corner space. *CH3, skip the next stitch, SC into the next stitch*. Repeat between ** until you reach the last stitch of this side.
Square 2
Joining the second square to the first square.
CH5, on the second square SC in the first stitch after the bottom right corner.
NOTE: Working UP the right hand side of this square.
*CH1, REMOVE your hook, insert your hook under the last CH3 loop on the first square, grab the the CH1 loop and pull trough, CH2, skip a stitch on square number 2, SC in the next stitch*. Repeat between ** until you worked trough all 22 loops and you are on the top of this side.
CH3, REMOVE your hook, insert your hook under the CH5 loop on the corner of the first square, grab the CH3 and pull trough, CH3, SC in the first stitch left of the top right CH2 corner space of the second square. *CH3, skip the next stitch, SC into the next stitch*. Repeat between ** until you reach the last stitch of this side. The last stitch should be the final stitch before the CH2 corner space. There will be 22 CH3 loops across the side of the square
CH5, skip the CH2 corner space, SC in the first stitch after the CH2 corner space. *CH3, skip the next stitch, SC into the next stitch*. Repeat between ** until you reach the last stitch of this side.
Square 3
Joining the third square to the second square.
CH5, on the third square SC in the first stitch after the bottom right corner.
NOTE: Working UP the right hand side of this square.
*CH1, REMOVE your hook, insert your hook under the last CH3 loop on the second square, grab the the CH1 loop and pull trough, CH2, skip a stitch on square number 3, SC in the next stitch*. Repeat between ** until you worked trough all 22 loops and you are on the top of this side.
CH3, REMOVE your hook, insert your hook under the CH5 loop on the corner of the second square, grab the CH3 and pull trough, CH3, SC in the first stitch left of the top right CH2 corner space of the third square. *CH3, skip the next stitch, SC into the next stitch*. Repeat between ** until you reach the last stitch of this side.
The last stitch should be the final stitch before the CH2 corner space. There will be 22 CH3 loops across the side of the square.
CH5, skip the CH2 corner space, SC in the first stitch after the CH2 corner space. *CH3, skip the next stitch, SC into the next stitch*. Repeat between ** until you reach the last stitch of this side.
Bottom side of squares 3, 2, 1
You are now down the bottom at the left hand side of square 3, Turn your work and continue along the bottom of this square.
CH5, skip the CH2 corner space, SC in the first stitch after the CH2 corner space. *CH3, skip the next stitch, SC into the next stitch*. Repeat between * until you reach the last stitch of the bottom side of square 3.
CH3, REMOVE your hook, insert your hook under the CH5 loop on the corner of the second square, grab the CH3 and pull trough, CH3, SC in the first stitch after the CH2 corner space of square 2. Continue with *CH3, skip the next stitch, SC into the next stitch*. Repeat between * until you reach the last stitch of the bottom side of square 2.
CH3, REMOVE your hook, insert your hook under the CH5 loop on the corner of the first square, grab the CH3 and pull trough, CH3, SC in the first stitch after the CH2 corner space of square 1. Continue with *CH3, skip the next stitch, SC into the next stitch*. Repeat between * until you reach the last stitch of the bottom side of square 1.
Row 2
Square 4
Joining the 4th square to the first and second square. CH5, SC in the first stitch after the CH2 corner space of square 4. *CH1, REMOVE your hook, insert your hook under the first CH3 loop of square 1, grab the CH1 and pull trough, CH2, skip a stitch, SC in the next stitch*. Repeat between * for the next 21 loops.
After completing the 22th CH3 loop: CH3, REMOVE your hook, insert your hook under the CH5 loop at the bottom right corner of square 2, grab the CH3 and pull trough, CH3, SC in the first stitch after the CH2 corner space down the left side of square 4 (the CH’s are diagonally).
*CH3, skip the next stitch, SC into the next stitch*. Repeat between * until you reach the last stitch of this side.
Square 5
Joining the fifth square to the squares 1, 2, 3 and 4.
CH5, on the fifth square SC in the first stitch after the bottom right corner. NOTE: Working UP the right hand side of this square. *CH1, REMOVE your hook, insert your hook under the last CH3 loop on the 4th square, grab the the CH1 loop and pull trough, CH2, skip a stitch on square number 5, SC in the next stitch*. Repeat between * until you worked trough all 22 loops and you are on the top of this side.
After completing the 22th CH3 loop: CH3, REMOVE your hook, insert your hook under the CH5 loop at the bottom left corner of square 1, grab the CH3 and pull trough, CH3, SC in the first stitch after the CH2 corner space of square 5 (the CH’s are diagonally and this makes a 4 looped shape).
*CH1, REMOVE your hook, insert your hook under the first CH3 loop of square 2, grab the CH1 and pull trough, CH2, skip a stitch, SC in the next stitch*. Repeat between * for the next 21 loops.
After completing the 22th CH3 loop: CH3, REMOVE your hook, insert your hook under the CH5 loop at the bottom right corner of square 3, grab the CH3 and pull trough, CH3, SC in the first stitch after the CH2 corner space down the left side of square 5 (the CH’s are diagonally).
*CH3, skip the next stitch, SC into the next stitch*. Repeat between * until you reach the last stitch of this side.
Square 6
Joining the 6th square to the squares 2, 3 and 5. CH5, on the 6th square SC in the first stitch after the bottom right corner. NOTE: Working UP the right hand side of this square. *CH1, REMOVE your hook, insert your hook under the last CH3 loop on the 5th square, grab the the CH1 loop and pull trough, CH2, skip a stitch on square number 6, SC in the next stitch*. Repeat between * until you worked trough all 22 loops and you are on the top of this side.
After completing the 22th CH3 loop: CH3, REMOVE your hook, insert your hook under the CH5 loop at the bottom left corner of square 2, grab the CH3 and pull trough, CH3, SC in the first stitch after the CH2 corner space of square 6 (the CH’s are diagonally and this makes a 4 looped shape).
*CH1, REMOVE your hook, insert your hook under the first CH3 loop of square 3, grab the CH1 and pull trough, CH2, skip a stitch, SC in the next stitch*. Repeat between * for the next 21 loops.
After completing the 22th CH3 loop: CH3, REMOVE your hook, insert your hook under the CH5 loop at the bottom left corner of square 3, grab the CH3 and pull trough, CH3, SC in the first stitch after the CH2 corner space of square 6.
*CH3, skip the next stitch, SC into the next stitch*. Repeat between * until you reach the last stitch of this side.
Bottom side of squares 6, 5, 4
You are now down the bottom at the left hand side of square 6, Turn your work and continue along the bottom of this square.
CH5, skip the CH2 corner space, SC in the first stitch after the CH2 corner space. *CH3, skip the next stitch, SC into the next stitch*. Repeat between * until you reach the last stitch of the bottom side of square 6.
CH3, REMOVE your hook, insert your hook under the CH5 loop on the corner of the 5th square, grab the CH3 and pull trough, CH3, SC in the first stitch after the CH2 corner space of square 5. Continue with *CH3, skip the next stitch, SC into the next stitch*. Repeat between * until you reach the last stitch of the bottom side of square 5.
CH3, REMOVE your hook, insert your hook under the CH5 loop on the corner of the 4th square, grab the CH3 and pull trough, CH3, SC in the first stitch after the CH2 corner space of square 4. Continue with *CH3, skip the next stitch, SC into the next stitch*. Repeat between * until you reach the last stitch of the bottom side of square 4.
Rows 3 and 4
Follow the instructions of row 2 for rows 3 and 4. See the diagram for the squares you need to stitch together.
When you reach the final stitch of the bottom of the row: CH5, skip the CH2 corner space of square 10, SC in the first stitch after the CH2 corner space, continue up the right hand side in the same way as you worked along the bottom of your rows of squares.
After the last SC in the final stitch; CH5, SL ST to the first CH of the beginning CH4.
Do NOT fasten off. You will be continuing from here into the border.
BORDER INSTRUCTIONS
Round 1
Continuing from joining; CH1 (does not counts as a stitch), work {2HDC} into each CH3 space around, with {2HDC, CH2, 2HDC} in each CH5 corner space. SL ST to first HDC to join.
Round 2
CH4 (counts as first TC), work 1TC in each stitch around, with {2TC, CH2, 2TC} in the CH2 corner spaces of row 1. SL ST to first TC to join.
Round 3
For the final round we use the Twisted Single Crochet Stich.
CH1, start working a single crochet stitch into the next stitch: insert the hook into the stitch, and pull up a loop, now rotate your hook counterclockwise (360 degrees), yarn over and pull the yarn through the 2 loops. Repeat in the next stitches, with 3 Twisted Single Crochet stitches in every corner.
After the last stitch, SL ST into the first Twisted Single Crochet stitch of the blanket.
Fasten off and weave in ends.
You have now finished the Wildlife Animal Blanket. What began as a collection of individual squares has now come together as a warm, meaningful, and beautifully textured keepsake. Every animal, every stitch, and every moment you spent working on this project is now part of a finished blanket full of personality and heart.
Whether you made it for yourself, a little explorer, or as a special handmade gift, take a moment to admire your hard work. This is a project to be truly proud of. Enjoy snuggling under it, displaying it, or gifting it with love.
Stay Connected
I’d love for you to join me on this creative adventure beyond the pattern!
You can follow Crazy Crochet Studio on social media:
- Pinterest: https://nl.pinterest.com/thecrazycrochetstudio/
- Instagram: https://www.instagram.com/crazycrochetstudio/
If you’ve made one (or even all!) of the Wildlife Animal Blanket squares, don’t forget to tag @crazycrochetstudio when you share your photos. I absolutely love seeing your beautiful creations come to life!
Love this CAL. Filet is one of my favourites so when I saw this I was really excited. I’m making them as they come out. Just wondering how many are you planning on creating?
Aw, thank you so much! I’m so happy to hear you’re enjoying the CAL. I’m planning to make 12 squares in total for a big, cozy blanket. It’s been such a joy designing each animal, and I can’t wait to share all of them as the series grows!