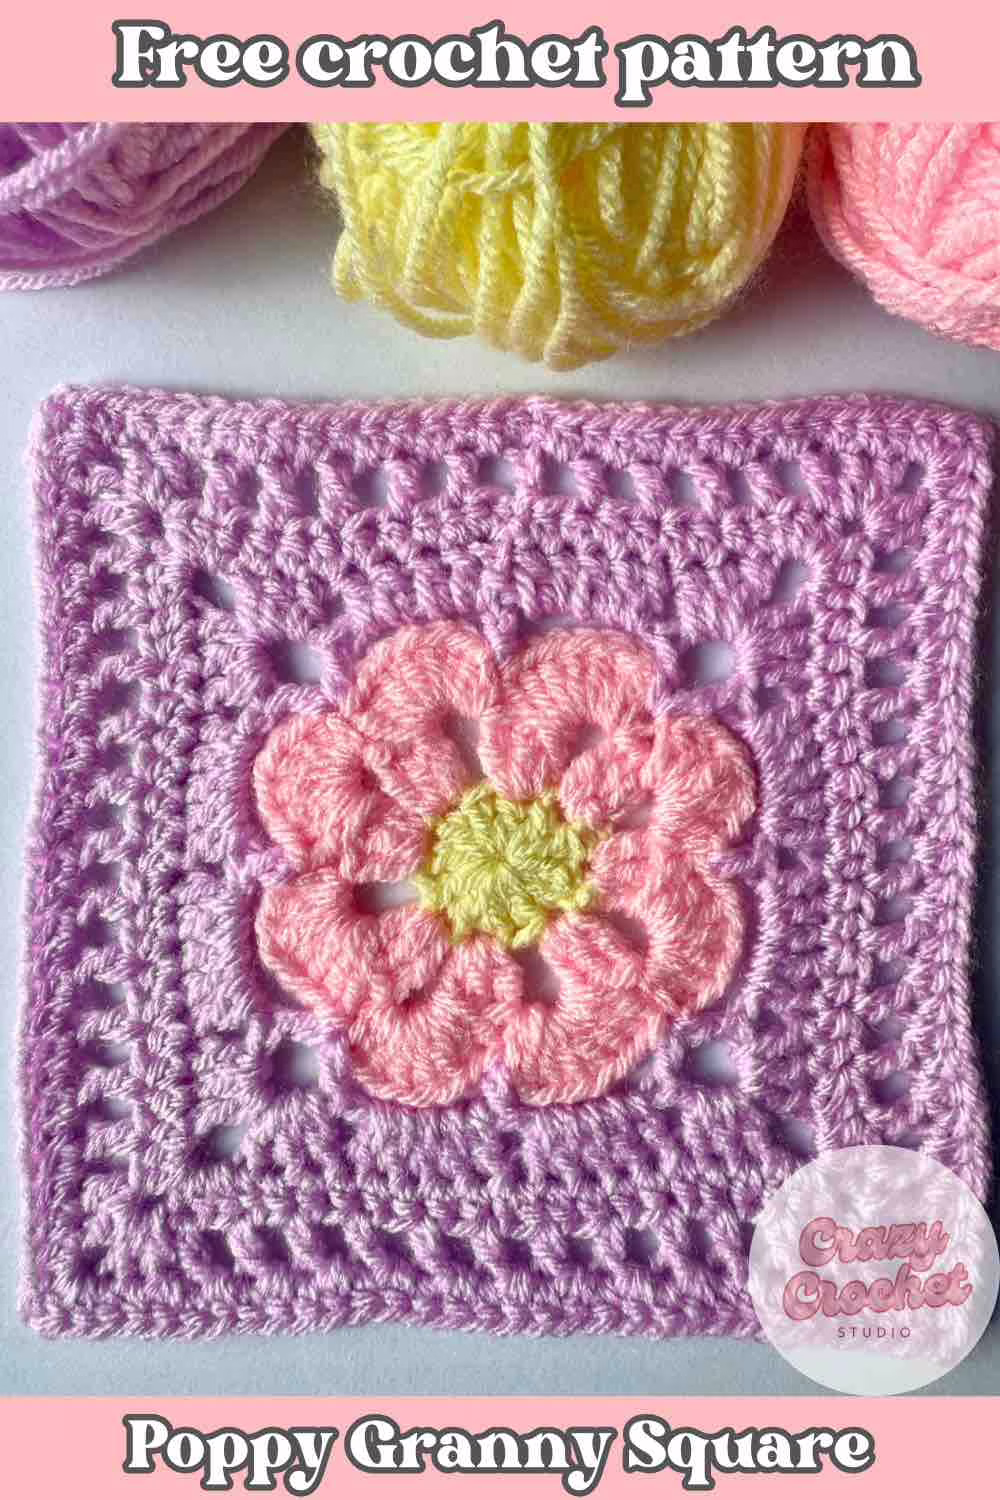
I’m excited to share this free Poppy Granny Square pattern, inspired by the beautiful poppies that bloom in our garden each summer. I’ve always been drawn to their delicate shape and bold red color. They are such a vibrant reminder of the season in full bloom.
For this version, I decided to use soft pastel shades instead of the classic red. The result is a lighter, more whimsical take on the flower that still captures its charm in a gentle, subtle way.
These colors also pair perfectly with my free Flamingo Square pattern, making the two a lovely combination for a coordinated blanket or cushion with a soft, summery feel.
I hope this sweet little square brings some floral joy to your next project!
Disclaimer: This pattern is for your personal use only and cannot be sold, copied, or reproduced in any way without permission from the designers. You may sell finished objects made from this pattern in small quantities but please provide pattern credit back to crazycrochetstudio.com as the pattern designer when posting online. Do not use my photos when selling your finished items.
Supplies needed
For this pattern, you’ll need DK (double knit) #3 weight yarn. I used Stylecraft Special DK in the colors:
- Clematis (light purple)
- Candyfloss (soft pink)
- Lemon (pastel yellow)
You’ll also need a 4.0mm crochet hook, a tapestry needle for weaving in ends, and a pair of scissors.
Abbreviations, Color Guide and Notes
Before you get started on the Poppy Granny Square, here’s a quick overview of the stitches and color references you’ll be using.
This pattern is written in US crochet terms.
Stitches Used:
- CH = chain
- SL ST = slip stitch
- SC = single crochet
- HDC= half double crochet
- DC = double crochet
Color Guide:
- A = Yellow – Stylecraft Special DK, Lemon
- B = Soft Pink – Stylecraft Special DK, Candyfloss
- C = Purple – Stylecraft Special DK, Clematis
Notes:
- Any stitches written between { } should be worked into the same stitch or space.
- This square is worked entirely with the right side facing you. Do not turn your work throughout.
- Chain 3 at beginning of a round counts as first dc stitch.
Finished size
Once your Poppy Granny Square is complete, it will measure roughly 15 x 15 cm (6 x 6 inches). This makes it a wonderfully versatile little motif. Just the right size for blankets, cushions, bags, or any project where you want to add a touch of floral charm.
FREE CROCHET PATTERN: POPPY GRANNY SQUARE
Pattern instructions
Below, you’ll find the detailed written instructions for the poppy granny square.
Round 1:
With color A, start with a magic ring. Chain 3 and 11 DC in the magic ring. To close the round slip stitch into the top of the first CH3 and tighten the ring. Fasten off and weave in ends. (12)
Round 2:
Attach color B to any DC. CH3, {2DC} in the first stitch. *CH2, {3DC} in the next stitch, CH2, skip a stitch, {3DC} in the next stitch.* Repeat between ** 2 more times. End this round with CH2, {3DC} in the next stitch, CH2, skip 1 stitch, 1 sl st into the top of the first CH3. (40)
Round 3:
SL ST into the first CH2 space, {1SC, 7DC} into the same CH2 space. *{1SC, 7DC} in the next CH2 space*. Repeat between ** till end of the round. End with a SL ST into the first SC. Fasten off and weave in ends. (56)
Round 4:
Attach color C to any SC stitch of the previous round. CH3 (counts as a first DC), *CH4, {1DC in the next SC stitch (skip all the DC stitches), CH4, 1DC in the same SC stitch}, CH4, 1DC in the next SC stitch.* Repeat between ** 2 more times.
End this round with CH4, {1DC in the next SC stitch, CH4, 1DC in the same SC stitch}, CH4, SLST into the top of the first CH3. (60)
Round 5:
SLST into the CH4 space on the left side of the hook. CH3, 4DC in the same CH4 space. *{3DC, CH3, 3DC} in the next CH4 corner space, {5DC} in the next CH4 space, {5DC} in the next CH4 space.* Repeat between ** 2 more times. End this round with {3DC, CH3, 3DC} in the next CH4 corner space, {5DC} in the next CH4 space, SLST into the top of the first CH3. (76)
Round 6:
{2HDC in the same space as the SLST of the previous round}, 7HDC, *{3HDC, CH2, 3HDC} int the corner space, 8HDC, {2HDC}, 7HDC*. Repeat between ** 2 more times. {3HDC, CH2, 3HDC} in the last corner space, 8HDC, SLST into the first HDC. (23 stitches per side, plus CH2 at each corner).
Round 7:
topside – CH4 (counts as the first DC and CH1), skip a stitch, *1DC, CH1, skip a stitch*. Repeat between ** til the corner space.
left side – {2DC, CH2, 2DC} in corner space, CH1, skip a stitch, *1DC, CH1, skip a stitch*. Repeat between ** til the corner space.
bottom side – {2DC, CH2, 2DC} in corner space, CH1, skip a stitch, *1DC, CH1, skip a stitch*. Repeat between ** til the corner space.
right side and top side – {2DC, CH2, 2DC} in last corner space, CH1, skip a stitch, *1DC, CH1, skip a stitch*. Repeat between ** til last stitch. SLST into the top of the first CH3. (27 stitches per side, plus CH2 at each corner).
Round 8:
16HDC, *{2HDC, CH2, 2HDC} in corner space, 27HDC*. Repeat between ** 2 more times. {2HDC, CH2, 2HDC} in last corner space, 11DC, SLST into the top of the first HDC. (31 stitches per side, plus CH2 at each corner).
Fasten off and weave in ends.
Social Media
- Pinterest: https://nl.pinterest.com/thecrazycrochetstudio/
- Instagram: https://www.instagram.com/crazycrochetstudio/
Come say hi, follow along, and tag me in your makes. I always love seeing your creations!