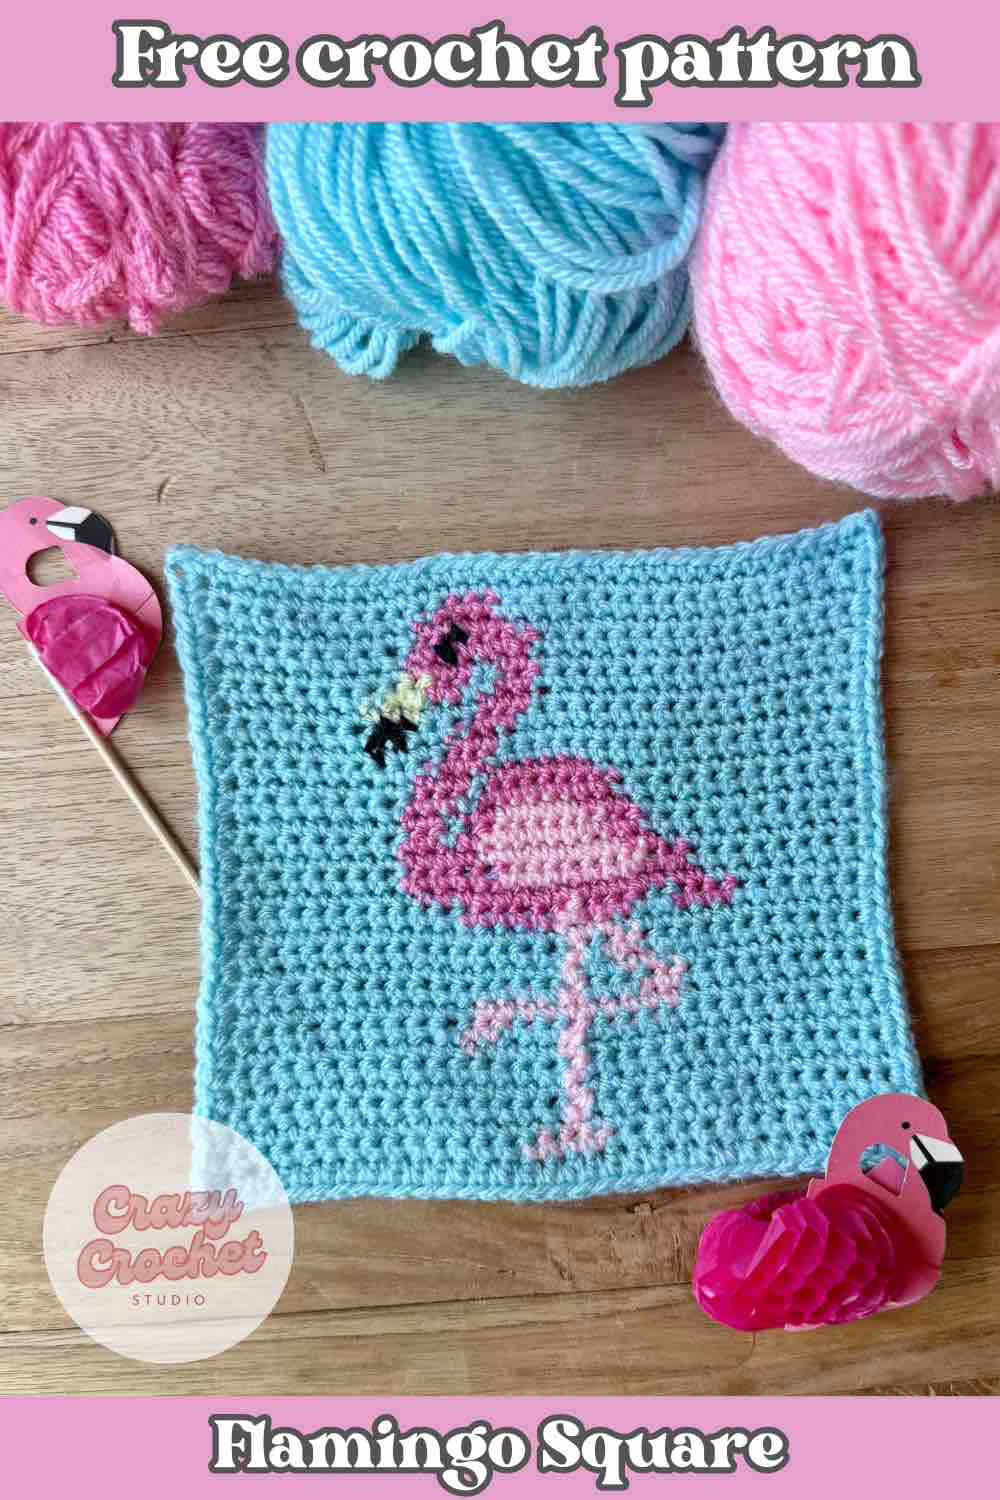
This design was inspired by my love for all things tropical. There is just something about flamingos that instantly brings to mind warm breezes, sunny skies, and that laid-back beach vibe I can never get enough of. I wanted to capture that feeling in a playful square that’s perfect for summer-themed blankets, cushions, or even wall hangings.
But the biggest inspiration behind this square is my daughter. She absolutely adores flamingos. Not just for their graceful shape, but mostly because they’re pink. And pink is everything to her. It’s her favorite color in the world, and anything pink instantly becomes her favorite thing. So of course, I had to create a flamingo just for her.
Whether you’re stitching up a flamingo lover’s dream or adding a splash of summer to your next project, I hope this square brings as much joy to your hook as it did to mine. And best of all? it’s completely free, so you can start right away!
It also pairs beautifully with my free Poppy Granny Square pattern. The two squares together create a lovely contrast of tropical charm and floral warmth. Perfect for mixing and matching in a unique blanket.
Disclaimer: This pattern is for your personal use only and cannot be sold, copied, or reproduced in any way without permission from the designers. You may sell finished objects made from this pattern in small quantities but please provide pattern credit back to crazycrochetstudio.com as the pattern designer when posting online. Do not use my photos when selling your finished items.
Materials
To create this bright and playful flamingo design, you’ll be working with soft and reliable DK (#3) yarn.
For my version, I used Stylecraft Special DK in the following colors:
– Sherbet, Fondant, Candyfloss, Black, and Lemon.
I used a 4.0 mm crochet hook.
You’ll also want to have a tapestry needle ready for weaving in your ends and a pair of scissors for trimming as you go.
Gather your materials, pick your favorite pink, and you’re ready to start stitching your flamingo!
Abbreviations & Color Guide
Before you get started, here’s a quick overview of the stitches and colors used in this flamingo design.
The pattern is written in US crochet terms.
Stitches:
- ch = chain
- sl st = slip stitch
- sc = single crochet
- rs = right side
- ws = wrong side
Color Key:
- A = Blue — Stylecraft Special DK, Sherbet
- B = Soft Pink — Stylecraft Special DK, Candyfloss
- C = Pink — Stylecraft Special DK, Fondant
- D = Black — Stylecraft Special DK, Black
- E = Yellow — Stylecraft Special DK, Lemon
Note: Any stitches written between { } should be worked into the same stitch or space.
With these basics in hand, you’re all set to dive into the pattern!
Finished size
The completed flamingo square measures approximately 15 x 15 cm (6 x 6 inches), making it a charming and compact piece that’s perfect for mixing and matching in larger projects. Its size is ideal for building colorful blankets, fun cushion covers, or even assembling into a playful wall hanging.
Of course, the finished size may vary slightly depending on your tension, yarn choice, or hook size.
FREE CROCHET PATTERN: FLAMINGO SQUARE
The Flamingo Square is created using a combination of tapestry and intarsia crochet techniques, allowing you to seamlessly work with multiple colors to bring the flamingo design to life. Despite the color changes, this pattern uses only the basic single crochet stitches, making it accessible even if you’re new to colorwork.
You can follow the pattern using a detailed color chart or fully written instructions, whichever you’re more comfortable with. Both options are provided, so you can choose your preferred way of reading the pattern. Or use a mix of both!
Chart
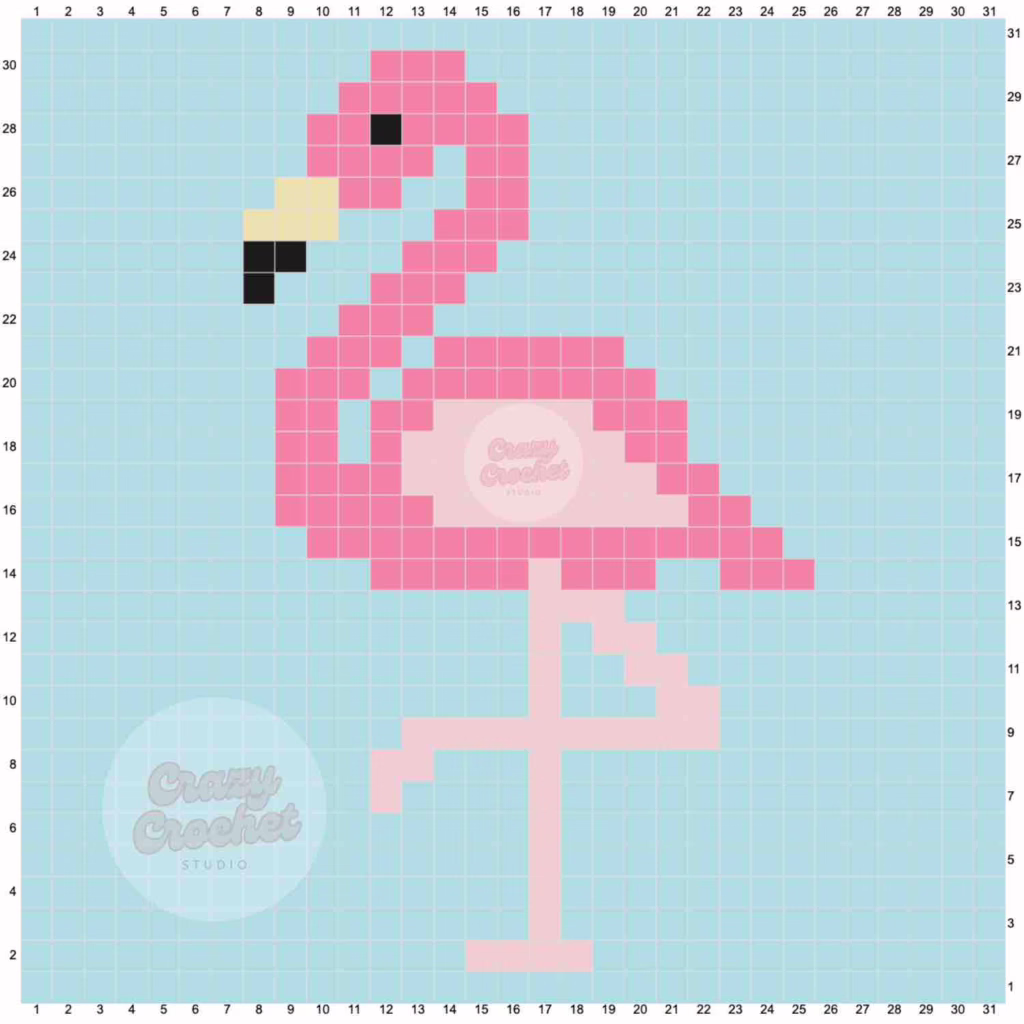
Chart Notes
- Each square on the chart represents 1 stitch.
- All odd numbered rows are right side (rs) rows, and all even rows are wrong side (ws) rows.
- Chart is read from bottom to top. Rows on the right side are read from right to left, and rows on the wrong side are read from left to right.
Notes
- Ch 1 at beginning of row does not count as a stitch.
- Keep all yarn ends on the wrong side of the square.
- To change colors, on the last step of the sc, drop the working yarn and finish the sc with the new color.
Written Pattern Instructions
Start with colour A and ch32
Row 1 (rs)
With A sc in the second ch from the hook, 30sc. Turn. (31)
Row 2 (ws):
ch1. With A 14sc, with B 4sc (carry A), drop B and with A 13sc. Turn.
Row 3 (rs):
ch1. With A 14sc, with B 1sc, drop B and with A 16sc. Turn.
Row 4 (ws):
ch1, With A 16sc, with B 1sc, drop B and with A 14sc. Turn.
Row 5 (rs):
ch1. With A 14sc, with B 1sc, drop B and with A 16sc. Turn.
Row 6 (ws):
ch1. With A 16sc, with B 1sc, drop B and with A 14sc. Turn.
Row 7 (rs):
ch1. With A 14sc, with B 1sc, with A 4sc (carry B), with B 1sc, drop B and with A 11sc. Turn.
Row 8 (ws):
ch1. With A 11sc, with B 2sc (carry A), with A 3sc (carry B), with B 1SC, with A 14SC (carry B till the 5th stitch in colour A and drop B). Turn.
Row 9 (rs):
ch1. With A 9sc, with B 10sc (carry A), drop B and with A 12sc. Turn.
Row 10 (ws):
ch1. With A 16sc (at the 13th stitch pick up B and carry till stitch 16) , with B 1sc, with A 3sc (carry B), with B 2sc (carry A), drop B and with A 9sc. Turn.
Row 11 (rs):
ch1. With A 10sc, with B 2sc (carry A), with A 2sc (carry B), with B 1sc, drop B and with A 16sc. Turn.
Row 12 (ws):
ch1. With A 16sc, with B 1sc, with A 1sc, with B 2sc (carry A), drop B and with A 11sc. Turn.
Row 13 (rs):
ch1. With A 12sc, with B 3sc (carry A), drop B and with A 16sc. Turn.
Row 14 (ws):
ch1. With A 11sc, with C 5sc (carry A), with B 1sc (carry A and C), drop B and with C 3sc (carry A), with A 2sc (carry C), with C 3sc (carry A), drop C and with A 6sc. Turn.
Row 15 (rs):
ch1. With A 7sc, with C 15sc (carry A), drop C and with A 9sc. Turn.
Row 16 (ws):
ch1. With A 8sc, with C 5sc (carry A), with B 8sc (carry A and C), drop B and with C 2sc (carry A), drop C and with A 8sc. Turn.
Row 17 (rs):
ch1. With A 9sc, with C 2sc (carry A), with B 8sc (carry A and C), drop B and with C 4sc (carry A), drop C and with A 8sc. Turn.
Row 18 (ws):
ch1. With A 8sc, with C 2sc (carry A), with A 1sc, (carry C), with C 1SC (carry A), with B 7sc (carry A and C), drop B and with C 2sc (carry A), drop C and with A 10sc. Turn.
Row 19 (rs):
ch1. With A 10sc, with C 3sc (carry A), with B 5sc (carry A and C), drop B and with C 2sc (carry A), with A 1sc, with C 2sc (carry A), drop C and with A 8sc. Turn.
You can cut yarn B, fasten off and weave in ends.
Row 20 (ws):
ch1. With A 8sc, with C 3sc (carry A), with A 1sc, with C 8sc (carry A), drop C and with A 11sc. Turn.
Row 21 (rs):
ch1. With A 12sc, with C 6sc (carry A), with A 1sc, with C 3sc (carry A), drop C and with A 9sc. Turn.
Row 22 (ws):
ch1. With A 10sc, with C 3sc (carry A), drop C and with A 18sc. Turn.
Row 23 (rs):
ch1. With A 17sc, with C 3sc (carry A), drop C and with A 3sc, with D 1sc, drop D and with A 7sc. Turn.
Row 24 (ws):
ch1. With A 7sc, with D 2sc (carry A), drop D and with A 3sc, with C 3sc (carry A), drop C and with A 16sc. Turn.
You can cut yarn D, fasten off and weave in ends.
Row 25 (rs):
ch1. With A 15sc, with C 3sc (carry A), drop C and with A 3sc, with E 3sc (carry A), drop E and with A 7sc. Turn.
Row 26 (ws):
ch1. With A 8sc, with E 2sc (carry A), drop E and with C 2sc (carry A), with A 2sc (carry C), with C 2sc (carry A), drop C and with A 15sc. Turn.
You can cut yarn E, fasten off and weave in ends.
Row 27 (rs):
ch1. With A 15sc, with C 2sc (carry A), with A 1sc, with C 4sc (carry A), drop C and with A 9sc.Turn
Row 28 (ws):
ch1. With A 9sc, with C 2sc (carry A), with D 1sc (carry A and C), drop D and with C 4sc (carry A), drop C and with A 15sc. Turn
You can cut yarn D, fasten off and weave in ends.
Row 29 (rs):
ch1. With A 16sc, with C 5sc (carry A), drop C and with A 10sc. Turn
Row 30 (ws):
ch1. With A 11sc, with C 3sc (carry A), drop C and with A 17sc. Turn
You can cut yarn C, fasten off and weave in ends.
Row 31 (rs):
ch1. With A 31sc.
Do not fasten off, but continue with the border.
Adding the Border
To finish your flamingo piece with a clean, polished edge, we’ll add a simple single crochet border. This helps the design keep its shape and makes it much easier to join if you’re creating a larger project.
Note: Any stitches written between { } should be worked into the same stitch or space.
With the right side (RS) facing you, begin as follows:
Start by chaining 2, then work 1 sc into the last stitch of Row 31 – this creates your first corner.
Left side:
Work 29 sc down the left edge of the square.
In the 31st stitch, work {1 sc, ch 2, 1 sc} to form the second corner.
Bottom edge:
Continue with 29 sc across the bottom.
In the 31st stitch, work {1 sc, ch 2, 1 sc} for the third corner.
Right side:
Work 29 sc up the right edge of the square.
In the 31st stitch, work {1 sc, ch 2, 1 sc} for the fourth corner.
Top edge:
Finish with 29 sc across the top, then 1 sc into the 31st stitch.
Join with a sl st into the first corner.
Fasten off and weave in your ends neatly. Your flamingo block now has a crisp, finished border ready for display or joining!
Follow Crazy Crochet Studio:
- Pinterest: https://nl.pinterest.com/thecrazycrochetstudio/
- Instagram: https://www.instagram.com/crazycrochetstudio/